Table of Contents
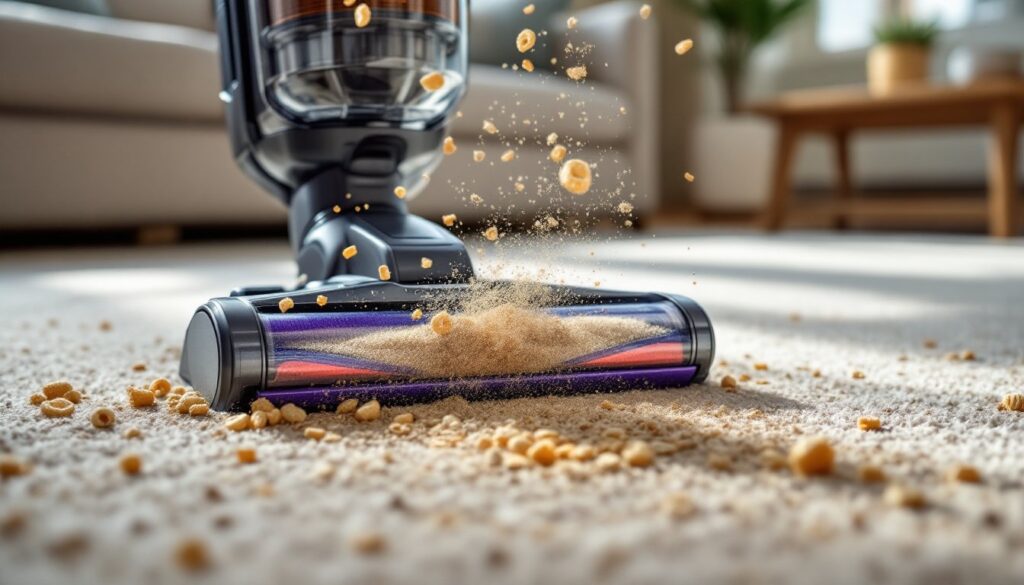
ToggleFew things are more frustrating than running a vacuum cleaner across the floor only to watch it spit debris right back out onto the carpet. Shark vacuums are reliable workhorses in most households, but when they start ejecting dirt instead of collecting it, something’s gone wrong. The good news? Most causes are simple mechanical issues that don’t require professional repair or replacement parts. This guide walks through the most common reasons a Shark vacuum spits out dirt and shows how to troubleshoot each one quickly.
Key Takeaways
- A full or overpacked dust cup is the most common reason a Shark vacuum spits out dirt—empty it after every cleaning session and inspect the cyclone assembly for hair tangles.
- Clogged hoses and blocked airflow paths reduce suction pressure and force debris backward; check all hose sections by holding them up to light and clear blockages with a wire hanger.
- Worn or damaged brush roll bristles that flatten below 1/4 inch can kick debris backward instead of forward—replace the roller every 6 to 12 months with moderate use.
- Dirty or improperly installed filters starve the vacuum of airflow; rinse foam filters monthly with cool water only and replace HEPA filters every six months, ensuring they seat correctly.
- Regular maintenance prevents Shark vacuum debris blowback before it starts—establish a schedule of weekly brush roll checks, monthly filter cleaning, and quarterly hose inspections.
- A cracked gasket, worn seals, or loose hose connections allow air to escape and reduce suction efficiency by up to 30%, so inspect and replace damaged parts promptly.
Understanding Why Shark Vacuums Spit Out Debris
When a vacuum cleaner expels dirt, it’s almost always a symptom of compromised airflow or mechanical failure in the collection system. Shark vacuums rely on continuous suction to pull debris into the dust cup and keep it there. If that airflow gets interrupted, by a blockage, a full bin, or a filter clogged with dust, the vacuum loses the pressure differential that holds particles in place.
As suction weakens, larger debris like cereal bits, pet hair clumps, or sand can tumble back out through the brush roll housing or the vacuum head. Smaller particles may escape through gaps created by a poorly seated dust cup or worn seals. In some cases, the brush roll itself becomes the culprit, flinging debris backward instead of feeding it into the suction path.
Identifying the root cause requires a methodical check of each component in the airflow chain: dust cup, hoses, filters, and brush roll. Most Shark models share similar designs, so the troubleshooting steps apply across upright, stick, and robot models. Start with the most obvious issues, full bins and visible clogs, before moving to less apparent problems like filter saturation or brush roll wear.
Clogged or Full Dust Cup
A full or overpacked dust cup is the single most common reason for debris blowback. Shark vacuums use a cyclonic separation system that spins dirt into the cup while allowing air to pass through. When the cup fills past the Max Fill line, debris blocks the cyclone intake, choking suction and forcing particles back out.
Empty the dust cup after every cleaning session, even if it looks only half full. Compacted pet hair, fine dust, and lint settle densely and reduce effective capacity faster than loose debris. To empty, press the release latch and hold the cup over a trash bin. Tap the sides to dislodge stuck material, don’t just dump and reattach.
After emptying, inspect the cyclone assembly inside the cup. Hair and string often wrap around the cone or screen. Pull these out by hand or use needle-nose pliers for stubborn tangles. Some Shark models have a removable cyclone cartridge: twist it counterclockwise and rinse it under warm water if allowed by the manual. Let it air-dry completely, 24 hours minimum, before reinstalling.
Check the dust cup seal where it latches to the vacuum body. A cracked gasket or warped rim allows air to escape, reducing suction and letting debris slip out. Replace damaged seals using Shark OEM parts: generic rubber gaskets rarely fit the contoured housing properly.
Blocked Hoses and Airflow Issues
Clogs inside the hose or internal airways create backpressure that forces debris to reverse direction. Shark vacuums typically have multiple hose sections: one connecting the floor head to the wand, another linking the wand to the dust cup, and internal channels running through the motor housing.
Detach each hose section by pressing the release tabs or twisting the collar, depending on the model. Hold each piece up to a light source and look through it, you should see clear daylight. Common blockages include wadded paper towels, socks, pet toys, and compacted dust plugs.
For stubborn clogs, use a straightened wire coat hanger or a plumber’s auger (not a motorized snake, which can puncture the hose). Push gently from both ends. Avoid sharp objects that might tear the interior corrugation. Once cleared, run water through the hose if the manual permits, then hang it to dry fully.
Inspect the connection points between hose segments. Cracks, splits, or loose fittings cause air leaks that sabotage suction. According to home appliance testing protocols, even a hairline crack can reduce vacuum efficiency by up to 30%. Wrap small cracks temporarily with HVAC foil tape (not duct tape, which degrades from heat), but plan to replace the hose soon.
Check the floor head intake as well. Flip the vacuum over and examine the opening where debris enters. Large objects like bottle caps or gravel can jam here. Remove the brush roll cover (usually two Phillips screws or twist-lock tabs) to access the chamber fully.
Worn or Damaged Brush Roll
The brush roll agitates carpet fibers and sweeps debris into the suction stream. When bristles wear down, the brush loses its ability to direct debris forward. Instead, it spins freely and can actually kick particles backward, especially on hard floors.
Remove the brush roll by releasing the side cap (twist or pull, depending on model) and sliding the roller out. Examine the bristles. They should stand perpendicular to the roller core. If they’re flattened, melted, or worn to nubs shorter than 1/4 inch, replacement is overdue. Shark recommends replacing the brush roll every 6 to 12 months with moderate use, or sooner for homes with multiple pets.
Clear any hair, string, or fishing line wrapped around the roller. Use scissors or a seam ripper to cut through tangled masses, then pull the debris free. Hair buildup not only reduces brush efficiency but also strains the motor and belt.
Inspect the belt that drives the brush roll. It should be taut, not stretched or cracked. A loose belt causes the brush to spin erratically or not at all, eliminating agitation. Belts are model-specific: consult the user manual or the label inside the brush roll compartment for the correct part number. Replacing a belt takes less than five minutes and requires no tools beyond a flathead screwdriver to pry the old belt off the motor shaft.
Some Shark models feature a self-cleaning brush roll with a comb that removes hair automatically. If debris still wraps around this type, the comb itself may be clogged. Wipe it down with a damp cloth and check that it moves freely.
Dirty or Improperly Installed Filters
Shark vacuums use foam and HEPA filters to trap fine particles before air exits the motor. When these filters clog with dust, airflow stalls, suction drops, and debris escapes back through the vacuum head. Most models have at least two filters: a pre-motor filter near the dust cup and a post-motor filter near the exhaust.
Locate both filters using the manual. Pre-motor filters are usually under a hinged door on the dust cup assembly. Post-motor filters sit behind a vent grille on the top or side of the unit. Remove each filter and tap it against the edge of a trash can to dislodge loose dust.
Rinse foam filters under cool tap water until the water runs clear. Do not use soap or detergent, residue can damage the foam structure or leave a film that restricts airflow. Gently squeeze out excess water (don’t wring or twist) and let the filter air-dry on a towel for at least 24 hours. Never reinstall a damp filter: moisture entering the motor housing can cause electrical shorts or corrosion.
HEPA filters vary by model. Some are washable, others are not. Check the filter frame for a “Do Not Wash” label. If washable, rinse carefully and dry thoroughly. If non-washable, tap out dust and replace the filter every 6 months or when it appears dark gray. Many vacuum maintenance guides recommend keeping a spare set of filters on hand to avoid downtime during drying.
Ensure filters seat correctly when reinstalling. A filter installed backward or without its frame can create gaps that let unfiltered air, and debris, bypass the collection system. Align any tabs or notches on the filter frame with corresponding slots in the housing.
How to Prevent Your Shark Vacuum From Spitting Out Dirt
Routine maintenance stops most debris blowback before it starts. Establish a simple schedule:
• Empty the dust cup after every use, even for quick cleanups. Don’t wait for the Max Fill line.
• Rinse foam filters monthly and replace HEPA filters every six months or per manufacturer guidance.
• Check the brush roll weekly for hair tangles and remove them immediately. Replace the roller when bristles wear below 1/4 inch.
• Inspect hoses and seals quarterly. Detach each section, look for cracks, and test suction at each connection point.
• Clean the cyclone assembly monthly. Remove the dust cup, tap out debris from the cone screen, and rinse if the model allows.
Store the vacuum in a dry location. Humidity can cause foam filters to develop mildew, reducing airflow and introducing odors. Avoid leaving the vacuum in a damp basement or unheated garage.
Use the correct floor setting. Many Shark uprights have a height adjustment for carpet versus hard floors. Running the vacuum too low on hardwood can trap debris under the head, forcing it backward. Running it too high on carpet reduces agitation and suction.
For homes with heavy pet shedding, consider using the vacuum’s attachments for upholstery and stairs rather than relying solely on the floor head. This spreads wear across multiple brush rolls and reduces the load on the main unit. Detailed approaches to managing pet hair are covered in many cleaning and organization resources.
Replace consumable parts proactively. Belts, brush rolls, and filters are wear items. Waiting until failure not only reduces performance but can also damage other components. Keep a small kit of spare parts (belt, filter set, brush roll) in your cleaning closet for quick swaps.
Conclusion
A Shark vacuum spitting out dirt is almost always a fixable issue. Start with the basics, empty the dust cup, clear any visible clogs, and rinse the filters. If the problem persists, inspect the brush roll and hoses for wear or blockages. Regular maintenance, including monthly filter cleaning and quarterly hose checks, keeps suction strong and debris where it belongs: in the bin, not back on the floor.