Table of Contents
ToggleA properly configured dishwasher drain hose isn’t just about keeping water flowing, it’s what stands between clean dishes and a kitchen flood. Most dishwasher installation problems trace back to drain hose errors: kinked lines, missing air gaps, or loops positioned too low. Understanding the dishwasher drain diagram means knowing how each component prevents backflow, protects your home from contamination, and keeps your appliance running smoothly. Whether installing a new unit or troubleshooting drainage issues, the drain hose configuration matters more than most homeowners realize. This guide breaks down every component, proper routing, code requirements, and the fixes that actually work.
Key Takeaways
- A properly configured dishwasher drain hose diagram shows how the high loop or air gap prevents wastewater from siphoning back into your dishwasher and contaminating dishes.
- The drain hose must be routed under the countertop and secured with hose clamps at both the dishwasher outlet and the disposal or tailpiece connection to prevent leaks and backflow.
- Most common dishwasher drainage problems—standing water, slow drainage, and leaks—result from kinked hoses, missing knockout plugs, or improperly positioned high loops rather than pump failure.
- Drain hose replacement is a straightforward DIY task requiring only basic tools and a replacement hose (typically $10–$20), saving money compared to professional service calls.
- Check your local plumbing code before installation, as some jurisdictions require air gaps while others accept high loops, and retrofitting an air gap after countertop installation is significantly more involved.
Understanding Your Dishwasher Drain Hose System
The dishwasher drain system is a closed loop designed to evacuate wastewater while preventing contaminated water from siphoning back into the appliance. Unlike supply lines that operate under constant pressure, the drain hose relies on gravity and the dishwasher’s internal pump to push water through.
Most residential dishwashers use a ribbed vinyl or rubber drain hose, typically 5/8-inch inner diameter, that connects the dishwasher’s drain pump outlet to either the garbage disposal, a dedicated dishwasher tailpiece on the sink drain, or a standpipe. The hose must be routed in a specific configuration to comply with plumbing codes and prevent backflow.
The drain cycle works in stages: the pump activates, forcing water through the hose and into the household drain line. If the hose isn’t looped or vented correctly, wastewater can reverse direction during the sink’s drainage cycle, contaminating dishes or causing the dishwasher to malfunction.
Two primary methods meet code for backflow prevention: the high loop and the air gap. Your jurisdiction’s plumbing code (typically based on the International Plumbing Code or Uniform Plumbing Code) determines which is required. Some regions mandate air gaps: others accept high loops. Check local requirements before finalizing your installation, retrofitting an air gap after countertop installation is far more involved than doing it right the first time.
Key Components in a Dishwasher Drain Hose Diagram
A complete dishwasher drain diagram includes several critical parts, each serving a specific function:
Drain Pump Outlet: Located at the dishwasher’s base, this threaded or barbed fitting connects to the drain hose. Most use a 3/4-inch ribbed barb that requires a hose clamp for secure attachment.
Drain Hose: The corrugated hose itself, usually 5 to 6 feet long. Replacement hoses are sold in 6-foot and 12-foot lengths at most hardware stores. The ribbing adds flexibility but also creates friction, so excess length should be trimmed, not coiled.
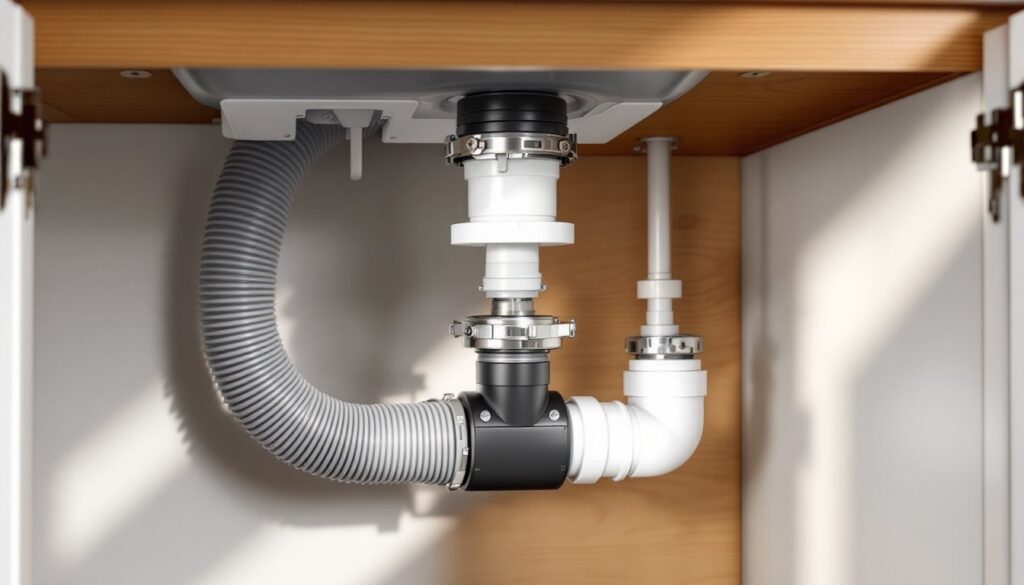
High Loop or Air Gap: The backflow prevention component. A high loop is simply the drain hose routed up and secured to the underside of the countertop, creating an inverted U-shape. An air gap is a cylindrical fixture mounted through the countertop or sink deck, physically separating the dishwasher drain from the household drain line with an air break.
Dishwasher Tailpiece or Disposal Inlet: The connection point at the sink drain. Garbage disposals have a dedicated dishwasher inlet with a knockout plug that must be removed. If no disposal is present, a dishwasher tailpiece (a specialized drain fitting with a side inlet) installs between the sink strainer and P-trap.
Hose Clamps: Stainless steel worm-drive clamps (typically 3/4-inch to 1-1/4-inch diameter) secure connections and prevent leaks under pump pressure.
Mounting Bracket: A plastic or metal bracket that secures the high loop to the cabinet underside, keeping the hose elevated.
Understanding how these components interact is essential for both new installations and diagnosing drainage issues. A missing knockout plug or a high loop positioned too low can create drainage problems that mimic a failing pump.
Proper Drain Hose Installation: Step-by-Step Configuration
Installing a dishwasher drain hose correctly prevents most common drainage problems. Here’s the proper sequence:
1. Prepare the disposal or drain connection. If connecting to a garbage disposal, remove the knockout plug from the dishwasher inlet. Use a screwdriver and hammer to punch it inward, then retrieve the plug from inside the disposal chamber. If using a sink drain without disposal, install a dishwasher tailpiece between the strainer and P-trap.
2. Measure and trim the hose. Run the hose from the dishwasher’s drain outlet to the connection point, allowing extra length for the high loop. Avoid excess, each additional foot adds resistance. Cut with a utility knife if shortening is needed.
3. Attach the hose to the dishwasher. Slide a hose clamp over the hose end, push the hose firmly onto the drain pump outlet barb, and tighten the clamp with a 5/16-inch nut driver or screwdriver. The hose should seat at least 1 inch onto the barb.
4. Route and secure the high loop (if not using an air gap). Bring the hose up as high as possible under the countertop, ideally within 2 inches of the underside, and secure it with a mounting bracket or wire tie. This creates the necessary air break to prevent backflow.
5. Connect to the disposal or tailpiece. Push the hose onto the inlet fitting and secure with a hose clamp. Make sure the connection is tight: this joint is under pump pressure and will leak if loose.
6. Check for kinks and sags. The hose should have a smooth, gradual curve from the dishwasher to the high loop, then down to the drain connection. Any sharp bends or low spots can trap water and cause slow drainage.
7. Test the system. Run a short cycle and inspect all connections for leaks. Check under the sink during the drain cycle to confirm water flows freely.
The High Loop and Air Gap Requirements Explained
The high loop and air gap serve the same purpose, preventing wastewater from siphoning back into the dishwasher, but they work differently.
A high loop uses gravity. By elevating the drain hose above the sink’s flood rim (the highest point water can reach in the sink), it creates a physical barrier. Even if the sink backs up, water can’t flow uphill into the dishwasher. Most codes require the loop to be secured at least as high as the underside of the countertop, typically 30 to 32 inches above the floor.
An air gap provides a visible, physical separation. The device mounts through the countertop or sink deck, with one inlet from the dishwasher and two outlets: one to the drain and a small overflow vent. If the drain clogs, water exits through the vent cap rather than backing up into the dishwasher. Air gaps are required in many jurisdictions, especially in commercial installations, because they’re considered more reliable than high loops.
If your municipality requires an air gap and you don’t have one, it could be flagged during a home inspection or sale. Retrofitting involves drilling a hole in the countertop or sink deck, doable but more work than installing during initial setup. Dishwasher installation guides from manufacturers like those found in professional installation tutorials often include air gap installation diagrams.
Common Drain Hose Problems and How to Diagnose Them
Most dishwasher drainage issues stem from hose configuration or blockages, not pump failure. Here’s how to diagnose the usual suspects:
Standing water after a cycle: Check for a kinked hose first. Pull the dishwasher out slightly (disconnect power first) and inspect the hose path. A sharp bend can completely block flow. Also verify the disposal knockout plug was removed, this is a surprisingly common oversight that blocks drainage entirely.
Slow drainage or gurgling sounds: A partially clogged hose or drain connection is likely. Disconnect the hose at the disposal or tailpiece and check for debris buildup. Food particles, grease, and detergent residue can accumulate over time, especially in the ribbed sections of the hose.
Water backing up into the dishwasher: This indicates a failed or missing high loop/air gap. If the hose isn’t elevated properly, wastewater from the sink can siphon back during drainage. Inspect the high loop mounting, if the bracket has come loose, the hose may have dropped below the effective height.
Leaks at connections: Usually caused by loose or missing hose clamps. Tighten existing clamps or add new ones if connections were made without them. Check that hoses are fully seated on barbed fittings: a partial connection will leak under pressure.
Air gap overflow: If water flows from the air gap vent during the dishwasher’s drain cycle, the drain line between the air gap and disposal/tailpiece is clogged. Remove the air gap cap and check for debris in the outlet ports.
Dishwasher won’t drain at all: Before replacing the pump, disconnect the drain hose at the dishwasher and run a drain cycle. If water pumps from the outlet, the pump works and the blockage is in the hose or downstream connection. If no water comes out, the pump or internal filter may be at fault.
Proper diagnosis saves money. Replacing a $15 drain hose or clearing a knockout plug beats paying for an unnecessary pump replacement.
Replacing or Repairing Your Dishwasher Drain Hose
Drain hose replacement is straightforward and requires minimal tools. Here’s the process:
Tools and materials needed:
- Replacement drain hose (5/8-inch I.D., 6-foot or 12-foot length)
- Two stainless steel hose clamps (3/4-inch to 1-1/4-inch)
- 5/16-inch nut driver or flathead screwdriver
- Bucket and towels
- Adjustable wrench (if removing disposal connection)
- Utility knife (for trimming hose)
Step-by-step replacement:
1. Disconnect power and water. Turn off the dishwasher circuit breaker and shut off the water supply valve under the sink.
2. Access the drain hose. Pull the dishwasher forward enough to reach the connections. You may need to remove the lower kickplate and unscrew mounting brackets.
3. Disconnect at both ends. Loosen the hose clamps at the dishwasher drain outlet and at the disposal/tailpiece connection. Have a bucket ready, residual water will drain out. For installations following comprehensive dishwasher setup procedures, this step is clearly documented with visuals.
4. Remove the old hose. Pull the hose free and inspect the fittings for damage or buildup. Clean the disposal inlet and dishwasher outlet with a wire brush if needed.
5. Install the new hose. Attach one end to the dishwasher outlet with a hose clamp, route it through the cabinet with the proper high loop configuration, and connect the other end to the disposal or tailpiece. Secure both ends with clamps.
6. Test for leaks. Restore power and water, run a short cycle, and inspect all connections during the drain phase.
Repairing a damaged hose: Small cracks or holes can sometimes be patched with hose repair tape or a hose mender coupling, but replacement is more reliable. Drain hoses cost $10 to $20 and last 10+ years, so repair is rarely worth the effort.
Safety note: Always disconnect power before working on dishwasher components. The unit draws 120V, and water and electricity don’t mix. Wear safety glasses when working under the sink, disposal and drain connections can be sharp.
Conclusion
Understanding your dishwasher drain hose diagram turns a potentially frustrating repair into a manageable DIY project. The key is recognizing that most drainage problems come down to configuration errors, kinked hoses, missing air gaps, or improper high loops, rather than component failures. Route the hose correctly, secure connections with proper clamps, and verify backflow prevention meets local code. Whether referencing resources from outlets like Popular Mechanics for hands-on guides or tackling the install yourself, the principles remain the same. When in doubt, consult your municipality’s plumbing code or call in a licensed plumber for final inspection. A correctly installed drain hose is one less thing to worry about in a hardworking appliance.