Table of Contents
ToggleInstalling a Ring doorbell isn’t rocket science, but it’s one of those projects where skipping steps or guessing at wiring can leave you frustrated. Whether you’re replacing an old doorbell or mounting one on fresh siding, the process differs depending on whether you’ve got a wired or battery-powered model. This guide walks through both methods, covering the tools you’ll need, the safety steps that matter, and the app setup that turns a button on your wall into a functioning smart home device. Most installs take 30 minutes or less once you’ve gathered materials and killed power at the breaker.
Key Takeaways
- Setting up a Ring doorbell takes 30 minutes or less once you gather materials and disable power at the breaker, with the process varying between wired and battery-powered models.
- Both wired and battery-powered Ring doorbell installations require a 2.4 GHz Wi-Fi connection and the Ring app, making wireless network compatibility essential before you begin.
- For wired installations, confirm your doorbell transformer provides 16-24 VAC and use a non-contact voltage tester to verify power is off before touching any wires.
- Battery-powered Ring doorbells need a full charge (5-10 hours) before installation and typically last 3-6 months per charge depending on motion settings and usage patterns.
- Common setup failures like Wi-Fi connectivity issues, low battery warnings, or video lag can be resolved by checking signal strength, adjusting motion zones, or installing a Wi-Fi extender.
- Testing the complete installation—from doorbell button response to live view loading and night vision activation—confirms everything is working properly before you finish.
What You’ll Need Before Installing Your Ring Doorbell
Before touching any wires or drilling into your door frame, confirm you have the right tools and materials. Missing a single piece mid-install means leaving your doorbell half-mounted or exposed wiring live.
For wired installations:
- Non-contact voltage tester (to confirm power is off)
- Screwdriver set (Phillips and flathead)
- Wire strippers (if trimming doorbell wire)
- Drill with bits (for masonry anchors if mounting to brick or stucco)
- Level (a small torpedo level works fine)
- Existing doorbell wiring (typically 16-24 VAC from a transformer)
For battery-powered installations:
- Drill with bits (for mounting bracket)
- Screwdriver
- Level
- Masonry anchors (if not mounting to wood)
- Charged Ring battery pack (comes with the doorbell: charge it fully before starting)
Both setups require:
- Smartphone or tablet with the Ring app installed
- Wi-Fi network (2.4 GHz for most Ring models: 5 GHz isn’t universally supported)
- Your Ring account login
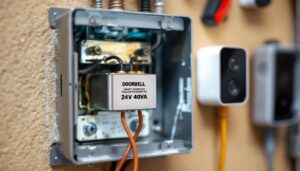
Check your doorbell transformer voltage if you’re doing a wired install. Ring doorbells typically need 16-24 VAC. Transformers are usually in the basement, garage, or inside the doorbell chime box. If yours is below 16 VAC, you’ll need to upgrade the transformer or switch to a battery model.
Plan for a second pair of hands if you’re mounting to brick or working above shoulder height. Holding a level, drill, and doorbell at once is doable but awkward.
Step-by-Step Installation: Wired Ring Doorbell
Wired installations connect to your existing doorbell wiring, which powers the device and keeps the battery topped off (if it’s a model with a backup battery). This method requires dealing with low-voltage wiring, but it’s straightforward if you follow safety steps.
Turning Off Power at the Breaker
Low-voltage doorbell systems won’t shock you like a 120V outlet, but it’s good practice to kill power before touching wires. Locate your breaker panel and flip the switch labeled “doorbell” or “chime.” If nothing’s labeled, turn off breakers one at a time and test your existing doorbell button until it stops working.
Once power is off, remove your old doorbell button. Most are held by two screws. Pull the button away from the wall to expose the wires. Use a non-contact voltage tester on the wires to confirm there’s no voltage. This takes five seconds and prevents guesswork.
If your old doorbell wiring is frayed or corroded, trim the damaged section with wire strippers and expose about 1/4 inch of fresh copper. Don’t skip this, poor wire contact is the top reason wired doorbells fail to power on.
Connecting the Wires and Mounting
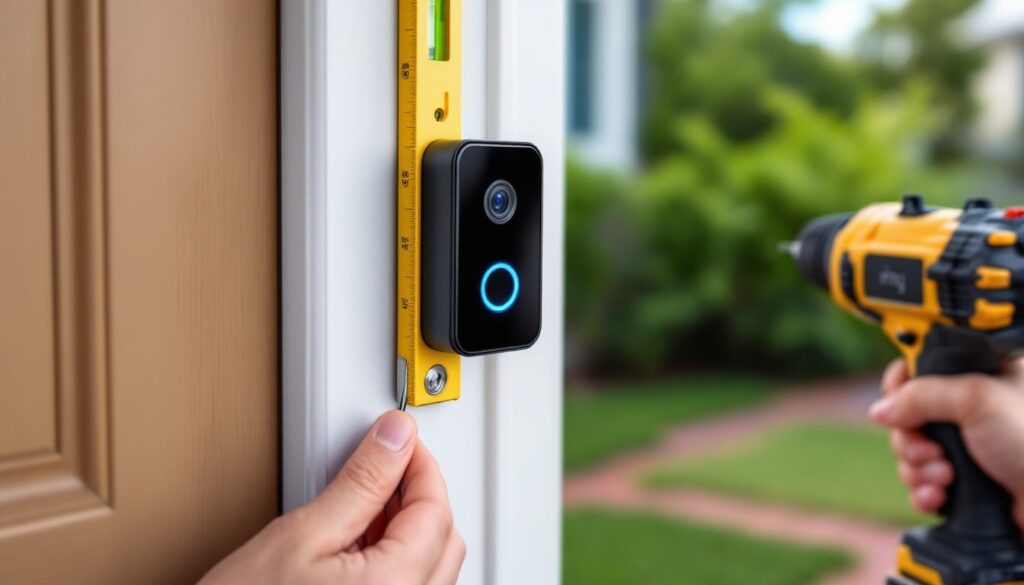
Thread your existing doorbell wires through the mounting bracket that came with your Ring doorbell. Most brackets have a rear channel for wire routing. Hold the bracket against your door frame and use a level to confirm it’s straight. Mark the screw holes with a pencil.
If you’re mounting to wood siding or a wooden door frame, drill pilot holes slightly smaller than the provided screws (usually a 1/8-inch bit works). For brick, stucco, or concrete, use a masonry bit and insert the included anchors first.
Secure the bracket with screws, then wrap each doorbell wire around the terminal screws on the back of the Ring doorbell. Most models label these terminals: polarity doesn’t matter for AC doorbell voltage. Tighten the terminal screws until the wire is snug, loose connections cause intermittent power issues.
Snap the Ring doorbell onto the bracket. You should hear a click. Some models include a security screw at the bottom to prevent removal: install this with the included Torx or specialty bit.
Restore power at the breaker. The Ring doorbell should light up or show a spinning light pattern within a few seconds. If nothing happens, double-check wire connections and transformer voltage. For detailed visual steps, wired doorbell installations often require checking transformer compatibility first.
Step-by-Step Installation: Battery-Powered Ring Doorbell
Battery-powered Ring doorbells skip the wiring entirely, which makes them ideal for locations without existing doorbell infrastructure or for renters who can’t modify electrical systems. The trade-off is recharging the battery every few months, depending on usage.
Charge the included battery pack fully before starting. Plug it into a standard USB charger (some Ring models come with a charging cable but no wall adapter, use any phone charger). A full charge takes 5-10 hours. The battery slides into the back of the doorbell: you’ll hear a click when it seats properly.
Hold the mounting bracket against your chosen location. Use a level to make sure it’s straight, nothing looks worse than a crooked doorbell. Mark the screw holes.
Drill pilot holes using the appropriate bit for your surface. For wood, a 1/8-inch bit works. For masonry, switch to a masonry bit and tap in the included anchors until they’re flush with the surface.
Secure the bracket with the provided screws. Don’t overtighten on vinyl siding or you’ll crack it. Hand-tight plus a quarter turn is enough.
Snap the Ring doorbell onto the bracket. Some models have a release tab on the bottom: others use a security screw. Install the security screw if included, it’s the only thing preventing someone from popping the doorbell off and walking away with it.
The doorbell will power on automatically once the battery is installed. You should see a light ring or indicator showing it’s ready for setup. If nothing happens, remove the battery and reseat it.
Battery life varies based on motion detection settings and how often the doorbell is triggered. Expect 3-6 months per charge in typical use. Cold weather (below 40°F) drains batteries faster. Some users keep a second battery charged and swap them out rather than unmounting the doorbell each time. Resources like battery-powered doorbell guides emphasize the importance of regular charging schedules for uninterrupted operation.
Configuring Your Ring Doorbell in the App
Physical installation is half the job. The Ring app handles device setup, Wi-Fi connection, and all the settings that control motion zones, alerts, and video quality.
Open the Ring app and tap “Set Up a Device.” Select “Doorbells” and choose your specific model from the list. The app will prompt you to scan the QR code on the back of the doorbell or inside the battery compartment. If the code won’t scan, you can enter the setup code manually.
The doorbell will enter setup mode, indicated by a spinning white light. The app will display available Wi-Fi networks. Select your 2.4 GHz network, most Ring doorbells don’t support 5 GHz, even if your router broadcasts both. Enter your Wi-Fi password carefully: a typo here means starting over.
Once connected, the app will check for firmware updates. Don’t skip this step. Ring pushes security patches and feature improvements regularly, and an outdated doorbell may have connectivity issues or missing features. Updates can take 5-10 minutes.
Next, name your doorbell (e.g., “Front Door”) and set your address. This affects motion detection settings and emergency response features if you subscribe to Ring Protect.
Configure motion zones by drawing boxes on the camera’s field of view. This prevents alerts every time a car passes on the street. Most users exclude sidewalks and focus zones on the walkway and porch. You can adjust sensitivity later if you’re getting too many or too few alerts.
Enable two-factor authentication on your Ring account. This prevents unauthorized access to your video feed. The app will send a code to your phone whenever you log in from a new device.
Test the doorbell button. Press it and confirm you receive a notification on your phone. Check that the chime (if you have one) rings. If you’re using a Ring Chime or Chime Pro, pair it in the app under “Chime Settings.”
For in-depth app configuration steps, resources like complete doorbell setup walkthroughs cover advanced settings such as privacy zones and alert schedules.
Testing and Troubleshooting Common Setup Issues
Once everything’s installed and configured, run through a full test before putting tools away. Press the doorbell button and confirm:
- Notification arrives on your phone within 5-10 seconds
- Chime sounds (if applicable)
- Live view loads in the app without excessive buffering
- Night vision activates in low light (cover the camera lens to force it)
Walk through the motion detection zone and verify you get a motion alert. Check the recorded video in the app to confirm image quality and framing. Adjust the doorbell angle if it’s pointed too high or low, most models have a wedge mount accessory for angled surfaces.
Common issues and fixes:
Doorbell won’t power on (wired): Verify transformer voltage with a multimeter. If it’s below 16 VAC, replace the transformer. Check wire connections at both the doorbell and the chime box, loose wires are the usual culprit.
Doorbell won’t connect to Wi-Fi: Confirm you’re using a 2.4 GHz network. Move your router closer to the doorbell temporarily to test signal strength. If your router uses special characters in the password, try simplifying it.
Frequent low-battery warnings (battery model): Cold weather, high motion activity, and live view usage all drain batteries faster. Reduce motion sensitivity or narrow motion zones to extend battery life. Consider a solar charger accessory if your doorbell gets direct sunlight.
Chime doesn’t ring: Wired doorbells may need a chime kit installed inside your existing chime box. This small adapter prevents the digital doorbell from interfering with mechanical chimes. Ring includes one with most wired models.
Video lag or poor quality: Check Wi-Fi signal strength in the app under Device Health. If RSSI (signal strength) is below -60, you need a Wi-Fi extender or mesh network node closer to the doorbell. Reducing video quality in the app can also help on slower connections.
If you’re still stuck, Ring’s support site has model-specific troubleshooting guides and live chat. Most setup problems boil down to Wi-Fi signal, transformer voltage, or firmware needing an update.