Table of Contents
ToggleThat thin panel at the bottom of your dishwasher might seem like the least important part of your kitchen, but it’s doing more work than you’d think. The dishwasher kick plate, also called a toe kick plate, hides plumbing connections, protects against spills, and keeps your kitchen looking finished. When it’s missing, damaged, or doesn’t match your updated cabinets, it sticks out like a sore thumb. Fortunately, removing, replacing, or customizing a kick plate is one of those satisfying afternoon projects that doesn’t require a contractor’s license or a trunk full of specialty tools.
Key Takeaways
- A dishwasher kick plate hides plumbing and electrical connections while protecting against spills and providing a finished kitchen appearance.
- Removing and installing a dishwasher kick plate is a straightforward DIY project that requires basic tools like a screwdriver, flashlight, and measuring tape.
- Replace your kick plate if you notice dents, cracks, rust, or water pooling under the dishwasher, as damage can lead to subfloor issues over time.
- Custom wood or panel-matched kick plates can elevate your kitchen design to a professional, seamless look when paired with updated cabinetry.
- Common kick plate problems like rattling, gaps, and water damage can be resolved through simple fixes including tightening screws, leveling the dishwasher, or upgrading materials.
What Is a Dishwasher Kick Plate and Why Does It Matter?
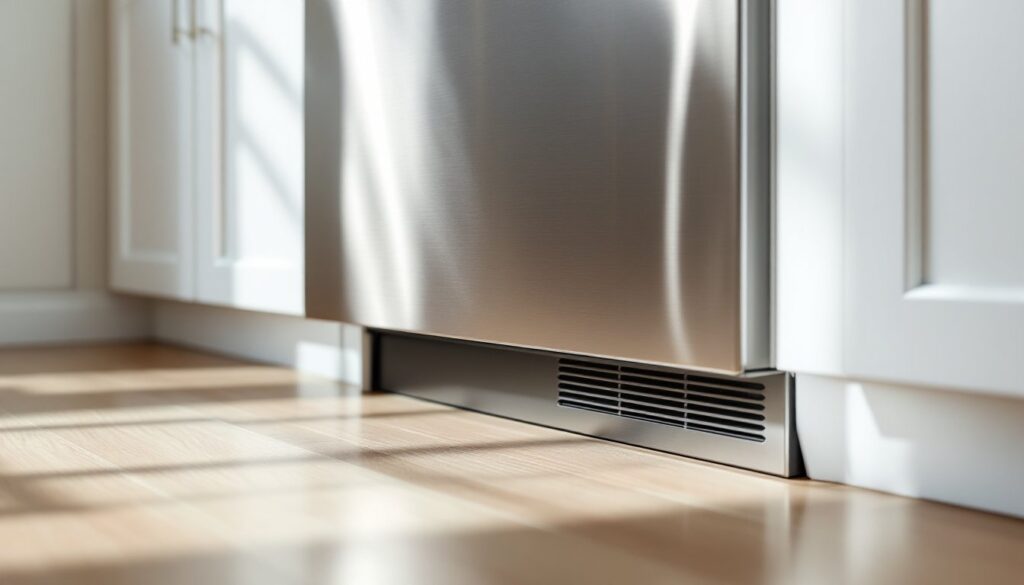
A dishwasher kick plate is the removable panel that covers the gap between the bottom of your dishwasher door and the floor. It typically measures 3–4 inches tall and spans the width of the appliance, matching either the dishwasher’s factory finish or your custom cabinet fronts.
This panel serves three practical purposes. First, it conceals the dishwasher’s adjustable leveling legs, water supply line, drain hose, and electrical connections, components that aren’t pretty to look at. Second, it acts as a splash guard, preventing water and food debris from migrating under the appliance during normal use. Third, it provides a finished look that integrates the dishwasher into your cabinetry.
Most dishwashers ship with a basic stainless steel or black kick plate that snaps or screws into place. Higher-end models and panel-ready units allow you to install a custom panel that matches your kitchen cabinets, creating a seamless built-in appearance. Some kick plates also incorporate a vent grille to allow airflow for the dishwasher’s drying cycle, particularly on models with heated dry functions.
When to Replace Your Dishwasher Kick Plate
Kick plates take a beating. They’re ground zero for kicked toys, vacuum cleaner bumps, pet scratches, and the occasional dropped skillet.
Replace your kick plate if you notice dents, cracks, or rust that compromise its appearance or function. Stainless steel panels are prone to corrosion if the protective coating gets chipped, especially in humid environments. Plastic or vinyl-wrapped plates can fade, warp, or crack over time.
A kitchen remodel is another common reason to swap out your kick plate. If you’ve updated your cabinets or switched from a stainless finish to panel-ready appliances, the old kick plate will look out of place. Many homeowners also replace factory kick plates with custom cabinet-matched panels to achieve a cohesive, high-end look without replacing the entire dishwasher.
If you’re experiencing water pooling under the dishwasher or notice a musty smell, remove the kick plate and inspect for leaks. A damaged or improperly seated plate can allow water to escape during wash cycles, leading to subfloor damage over time. This isn’t a cosmetic issue, it’s a maintenance red flag.
How to Remove a Dishwasher Kick Plate in 5 Simple Steps
Removing a dishwasher toe kick plate is straightforward, but the attachment method varies by manufacturer. Most use screws, spring clips, or a combination of both.
Tools you’ll need:
- Phillips or flathead screwdriver (depending on screw type)
- Flashlight or headlamp
- Work gloves (optional, to avoid sharp edges)
Step-by-step removal:
- Turn off the dishwasher. You don’t need to shut off water or power unless you’re accessing connections behind the plate.
- Locate the fasteners. Shine a light along the top edge of the kick plate. You’ll typically find two to four screws recessed into slots or visible along the top lip. Some models use spring clips instead, look for small tabs on the sides.
- Remove the screws. Use the appropriate screwdriver to back out each fastener. Set screws aside in a small container so they don’t roll under the appliance.
- Release any clips. If your model uses spring clips, gently pull the bottom of the plate toward you while pressing the release tabs inward. You may need to wiggle it slightly.
- Lift and remove the plate. Once fasteners are clear, tilt the panel down and pull it free. Watch for sharp edges on metal plates.
If the plate feels stuck, don’t force it. Check for hidden fasteners or dried-on grime along the edges. A bit of penetrating oil or gentle prying with a plastic putty knife can help.
Installing a New Dishwasher Kick Plate: A DIY Guide
Installing a replacement kick plate is the reverse of removal, but there are a few tricks to ensure a snug, rattle-free fit.
Materials and tools:
- Replacement kick plate (OEM or custom-cut panel)
- Screws (if not included with the new plate)
- Screwdriver
- Measuring tape
- Level (optional, for alignment)
- Safety glasses (if cutting a custom panel)
Installation steps:
- Measure and verify fit. Before you start, confirm that your replacement plate matches the width and height of the original. Standard dishwashers are 24 inches wide, but European models and compact units vary. Measure twice.
- Check for vent openings. If your dishwasher has a bottom vent, make sure the new plate has a matching grille cutout. Blocking airflow can cause overheating or poor drying performance.
- Align the plate. Position the top edge of the kick plate against the bottom of the dishwasher door frame. The plate should sit flush with the cabinet face on either side. If you’re working with a custom wood panel, ensure the grain direction matches your cabinets.
- Secure the fasteners. Insert screws into the pre-drilled holes at the top of the plate and tighten them snugly. Don’t overtighten, this can crack plastic plates or strip threads in the dishwasher frame. If using spring clips, push the plate into place until you hear or feel them click.
- Test the fit. Gently tug on the bottom of the plate to ensure it’s secure. Open and close the dishwasher door to verify there’s no interference or rattling.
For panel-ready dishwashers, you may need to attach a custom wood panel to a mounting bracket first, then install the bracket onto the dishwasher. Follow the manufacturer’s instructions for bracket placement and screw torque specs.
Customizing Your Kick Plate for a Seamless Kitchen Design
A custom kick plate can elevate your kitchen from builder-grade to designer-quality, especially if you’ve invested in panel-ready appliances.
Material options:
- Hardwood plywood (birch, maple, oak): Matches cabinet boxes: can be stained or painted to match door fronts. Use ¾-inch or ½-inch nominal thickness depending on your bracket system.
- MDF: Budget-friendly and takes paint well, but lacks durability in high-moisture areas.
- Stainless steel or aluminum sheet: For a modern, industrial look. Requires metal shears or a brake to cut cleanly.
- Thermofoil or laminate: Matches thermofoil cabinet doors: available in pre-finished sheets.
Cutting and finishing:
Measure the exact width between your cabinets and the height from the floor to the bottom of the dishwasher door. Subtract ⅛ inch from the width to allow for minor expansion and easier installation. Use a circular saw with a fine-tooth blade for plywood or MDF, or a miter saw for cleaner cuts.
If painting, apply a coat of primer first to seal the edges and prevent moisture absorption. Finish with two coats of cabinet-grade paint or polyurethane. Let each coat dry fully before handling.
For a truly seamless look, consider adding edge banding to exposed plywood edges. This thin veneer strip hides the layered core and gives a professional finish. You can find peel-and-stick edge banding at most home centers, or use iron-on versions for a stronger bond.
Pro tip: If you’re remodeling and have leftover cabinet door material, ask your cabinet shop to cut a matching kick plate. Many shops will do this for a nominal fee, and the finish will be factory-perfect.
Common Kick Plate Problems and Quick Fixes
Even a simple panel can cause headaches if it’s not sitting right.
Rattling or vibrating during wash cycles:
This usually means the screws have loosened over time. Remove the plate, check for stripped screw holes, and reinstall with slightly longer screws or add a washer for a tighter grip. If the dishwasher frame is plastic, avoid overtightening, use nylon-insert lock nuts if the holes are threaded.
Gaps along the sides or top:
If the plate doesn’t sit flush, the dishwasher may not be level. Check the leveling legs with a bubble level and adjust as needed. Most dishwashers have front legs that thread up or down with a wrench or pliers. Once the appliance is level, the kick plate should align cleanly.
Water damage or warping:
Wood or MDF panels can swell if exposed to standing water. Remove the plate, inspect the subfloor for leaks, and replace the panel with a moisture-resistant material like marine-grade plywood or a sealed hardwood. Consider adding a thin rubber gasket along the bottom edge to create a barrier against spills.
Missing or broken clips:
Replacement spring clips are available from appliance parts suppliers. Search by your dishwasher’s model number for exact-fit parts. In a pinch, you can fabricate a clip using a small metal L-bracket and a spring from a hardware store, though OEM parts are more reliable.
Vent blockage:
If your dishwasher isn’t drying properly and you’ve recently replaced the kick plate, check that the vent grille isn’t blocked. Lint, pet hair, and debris can accumulate in the vent slots. Remove the plate and vacuum out the opening. For recurring issues, consider a kick plate with a larger grille or install a mesh vent cover to keep debris out while allowing airflow.
Conclusion
A dishwasher kick plate is a small detail with a big impact on both function and style. Whether you’re replacing a damaged panel, upgrading to a custom finish, or troubleshooting a rattle, the process is well within reach for most DIYers. Take your time with measurements, choose materials that suit your kitchen’s moisture exposure, and don’t skip the finishing details. Your dishwasher, and your kitchen’s overall look, will thank you.